Tuesday, 28 May 2019

Bodywork - Part 5 - Welding


Quick recap.

Cut, grind, template, transfer, trial, prime steps completed. Now final clean and weld in.

Most panels areas required another trial and also to remove, clean the weld areas. Then a few holes or flange edges to ensure a good fit then tacked into place and then final weld.

There are not loads of photos in this section as I spent most of my time under the van welding and grinding to take photos!


All I can say is that welding upside down under a van with a welding helmet is hard!

But welding i find is strangely addictive!

After all welds are completed and have been ground down... next step finals painting

Stay tuned for Bodywork - Part 6 - Painting 


Bodywork - Part 4 - Repair Patches


After the last part 3 - Cutting each repair area could be assessed and CAD (Cardboard Aided Design) templates can be made.

These CAD models can then be transferred to sheet steel, cut and folded to fit the exact CAD model.

The metal repair patches are the trial fitted and fettle to fit. Once a good fit is found then they can be primed with weld trough and ready for the welding in part 5.

Front wheel arch / Sill


Nice simple patch for this to close up the sills. This will be one of the last panels I will weld in as it allow me to get pain into the sills.

Inner sill front

Simple patch. I decided to go down onto jacking point to give it some extra strength.

Inner sill rear

This area was a mess. There are two holes on the inner. either side of the jacking point.


The worst area is at the end of the middle sill and inner sill where they meet the wheel tub. The sides and of each and also the bottom need to be recreated.

The wheel tub closure panel will be welded over this to close it up.


Outer sill

The purchased outer sill will cover all the external edge. One small area of the edge of the inner sill was required


I then had to decide where to cut the old sill out. I had two choices, Cut at and leave the old sills door rubber OR cut at the lower edge of the sliding door track.

Both options are fine as the old sills rubber seal area is in good condition but cutting and joined old and new is hard. So I opted to cut out all of the old outer sill and join at the sliding door track as per the stock design.

The only downside of this is that I have to cut the old sill to track out without damaging the sliding door track. First thing was to remove the door. Then cut into little sections and remove old spot welds.


This was slow work, as I did not want to damage the sliding door track.

Then trial fitted the new sill


Nice to have some new metal fitted!

Rear wheel arch

This is one of the largest panel in length covering 1/3 of of the whole length.

I made the decision to leave the inside wheel tube repairs until the wheel arch is in place. It means that you have the best chance of joining the tub to arch alignment. The only downside is that you have to recreate the wheel tub lib when inside the tub which is tight to access.


The arch is trial fitted as full size. My plan was to flange this panel BUT it is too close and joined to the upper part of the wheel tube.

So I am going to have to cut the arch panel and the van and butt weld them together! Nightmare but possible. 

The panel will be cut down as I only want to remove as much as I need so in years to come there will be still original metal for future repairs.

Rear Bumper Mount

This was a nightmare to bend and fold. But got there in the end.


Battery Tray

The battery tray was an original VW part. 


Fitting the panel was a COMPLETE NIGHTMARE! having the rear corner and van complete it does not go past the light metalwork. Had to do plenty of cutting of edges to get it fitted.

Painting

Once all parts and panels are fabricated then I then coated everywhere with the weld through primer.


When looking at this there is not actually that much metal.

Recap

All repair patches have been through a complex CAD modeling then transferring to metal. Trial fitted, primed and painted.

Next step. Final clean and then welding!

Stay tuned for Bodywork - Part 5 - Welding

Bodywork - Part 3 - Cutting Out

All parts purchased. Now lets get started!

This post is outline all the areas of rust and rot which requires cutting out. Most were identified by the MOT inspectors crayon.

As always a small hole when stripped back the extent of the rot increases exponentially!

What starts out as a small hole always ends up huge!


Front wheel arch / Sill


No photo taken of the cut out area. Rough marked out repair patch in red.

Inner Sill Front


Small Hole on the front corner of the Inner front sill. 

Inner Sill Rear


Quite major holes at the end of the rear outer sill and then coming into the wheel tub at the rear. Red marks are roughly where the patches are to be made. The rot is mostly around end of the sills.

Outer Sill

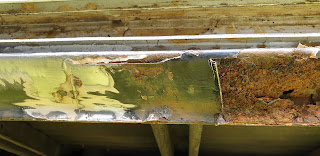
The outer sill was the most rotten of panels. There was quite a lot of rust at the front. and rear.


CANNOT quite believe what I have found. The Previous owner or Danbury had just put a patch over the rusty outer sill!

It was only spot welded at the corners! then covered in filler!

No wonder it was rusting out.

After some more cutting.........


The middle and inner sill was in reasonable condition. a Small lip section at the front will be required. Then plenty of good metal on the middle and rear to weld the outer to.

Rear Wheel Arch

Again the rear wheel arch was the major rust spot along the lower sections and over the wheel.


Sanded down paintwork. Found the small area of rust near the battery tray. Defined the cutting area height to take in this small area.


Peeled back the panel at the top cut. Very hard to remove with all the Factory seam sealant.


All removed. Was really hard to not cut too far into the wheel tub.


Most of the rot was at the front lower edge, along the wheel tub edge and the the rear spot near the battery tray.


Rust converter applied (It leaves a blue / black residue)

Rear Bumper Mount

The left hand rear bumper mount and rear valance bracket needed some work.


Most of the right angle bracket for holding the rear valance needed removing. Chassis rail is in good condition. A slight hole on the D Post.

Left hand outrigger

While underneath I noticed a small area on the out rigger which I missed.


Battery Tray

I found some rot in the main battery tray (Right hand side) after all the other welding was completed and I was going to close up the small hole near the wheel arch. I found it after finishing and was not even on the MOT failure as the underseal under the tray was hiding it!


A small area underneath.......


turns into a large area on top


Hole keeps getting larger!


Complete tray removed. Decided to cut the whole thing out


All this work just for this little hole!

All the tray was removed as it would not bee good to just patch the hole as the shape and pressing would be hard to replicate! New Battery tray on order.

Recap

After all the areas which require attention have been found. I applied the rust converter on all the rust areas before any really cutting out. This will allow the area to be stabilized before a larger area of good metal work to be exposed and repair patches made.

the repair areas where patches wight go were identified and marked in Red welders pencil marks.

The next step is to clean back the underseal and seal sealant back to bare metal, prime and template the repair patches.

Stay tuned for next post Bodywork - Part 4 - Repair Patches