Left Hand Wheel Arch - Part 2
So Part 1 concentrated in the Removal of rust and welding in new metal. Part 2 will be about the final prep and painting.

Final Welding prep on outside

First filler of Fiberglass epoxy filler to get all the pinholes

Welded area on inside the battery tray area

Lower sill area spot welded

Closing area at end of sill - Last patch to be fitted

Epoxy filler in panel gap. Will create the line later


Guide coated ready for sanding & filler.
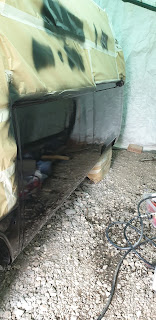
So as the Barn has no facilities for an internal spray booth I had to construct one outside at the rear. Luckily the guys at Bug Barn had a temp garage tent (Thanks Nige)


First sand down of filler and masked ready for Epoxy Primer

First Coat x2 coats of Primer. Bought a new brand of Primer. Much better coverage and finer grade than the Epoxy 121 brand. Also much flatter and easier to sand.


Spent a bit of time applying Glaze filler to get a final flatness before applying top primer coat. Its nice to have filler between 2 coats of epoxy just in case you sand through.

Final sand and mask up again for top coat of Primer.


Last coats increasing the solvents ratio with increasing layers

Cutting in progress


Final flatting and cutting compounds. Stepping down to finer and finer grades each polish. One small overlap area burnt through but quite low down along the sill area.


Betty is finally home. Lot more cutting and polishing up of layers. Also quite a few overspray on rear and around the rest of the bus.
A few finish up jobs such as the new bumpers. Will Waxoyl and protect once I have time.