Monday 5 November 2018

New Engine.... Part 6 - Fitting & first start


With the engine fully built up the fitting and then engine could be started!


1. Fitting

As the engine was built on the ATV jack it is ready to be installed straight in. The ATV jack and removable valance is the way to go for installing engines. So stable, slick and quick. Especially as I have to work solo.


Engine waiting ready to slide in on the plywood flooring.


There is quite a lot of wiring and cables to and from the ECU and also fuel and accelerator cable


Finally home


A Little tricky to get fitted. Last few inches always tricky to find the right combination of height and angle.

I recalled the great words of wisdom of the late Bob Hoover.........

"If it doesn’t want to go, stop. Take it out. Think about it a while. Check everything over and tackle it again after taking a break. (This time it’ll slide right in and leave you wondering, it was so easy. Veedubs got a sense of humor.)"

After a break and a cup of tea...... Slipped straight in :-)


All home and connected up Wiring and Fuel Lines.

Welcome to your new home!

Quick check of the Accelerator cable movement Fan belt attached, removed spark plugs and filled the oil read for the oil pressure test.


Not the final oil but okay for first few hundred miles.


Oil Level checked

2. Oil Pressure Test


Following the engine warranty and instructions supplied by the engine. Removal of spark plugs and fuel & HT, turn the engine over on starter motor until oil pressure warning light goes out.

Here is the video proof.


Also timed the time for the light to come back on. First time about 30 seconds. Second Oil pressure test around 78 seconds. Not bad. Seems to be holding pressure.

Quick check for any signs of oil leaks........


All dry and clean

4. First fire!


Checked tappets.

Its odd value of 0.10mm for the tappets but the instructions said to check the push rods for either Steel or aluminium. After checking with a magnet the new engine uses steel push rods so had to go for 0.1mm tappets.

So Tappets set. Oil pressure checked.

First fire up! Took a while for fuel to pump through. Used the 1 seconds prime of fuel pump repeatably to ensure fuel was there.


She is alive!

The engine fires up. No leaks and idle and accelerator fine. Yipeeeeee!

Moving on I have to fit the rear valance - Still got to put some paint on it.


All sort and snug and sealed. New Valance is okay.

Valance was filled but the etch primer had eaten a small edge of the filler.

Next job is to refit the bumper - It needs some serious rust and paint work. So much for powder coating


Monday 29 October 2018

New Engine.... Part 5 - The Build

Quick recap.

Had issues with my Brazilian Original UGA engine. Backfire and weird internal clicking / clonking noise and low on power.

Decided a replacement would be ideal and then a new zero mileage engine as I wanted a fully reliable engine going forward.

Ordered a SSP New AD dual port 1600cc engine. It arrived and this is document the build up.

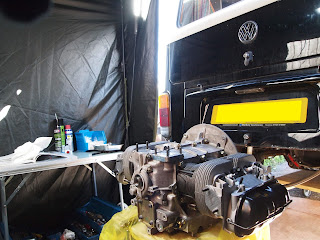
The "GarTent" and camping table all ready and setup. Engine on ATV trolley jack which is idea for building and fitting of engines in any van (especially if you have a removable valance)

The build Process:

The build started with a few bits fitted removed re-check and refitted.

Lots of photos to follow in roughly the same place and same order.


Issues / Areas of Interest:

1. Coolant Sensor

Placement of the coolant sensor required for the EFI injection system used on Brazilian bay.

Helpfully there is a  plate fitted on New Crankcases AD engine. Removed Tapped and drilled:


2. Oil Cooler

The Brazilian Bay uses a single port oil cooler BUT it is mounted in a doghouse in the fan housing like a dual port.

This is odd enough but as I wanted to retain the Brazilian fan housing I needed to fit a single port cooler.

The engine also uses a different adapter block to connect the cooler to the crankcase.

I purchased a new single port cooler from JK and then noticed that the single port uses 8mm ID oil flange. Check the old UGA brasilian crankcase and that also had 8mm ID. The new AD code engine uses 10mm ID oil flanges.

Panic set in but upon reading my go to engine building manual (Rebuild Air cooled VW Engines by Tom Wilson) it had a helpful guide on oil cooler seals.

They listed a 8mm to 10mm tapered seal for later and early oil coolers.

After a quick web search I found that Machine 7 had them in stock in Nuneaton which is only an hours drive away. Quick collection on Friday morning. Solved this problem.

Photos of the cooler and the Brazilian mounting on the UGA engine:


Here are the images from fitting the new engine and new cooler mounting block from Brazilian engine.


3. Tinware

So there were a few issues especially around the tinware fitment. As discussed in my earlier post about the difference for the Brazilian engine tinware the left and right lower baffles required to be fitted.

The issue was that the pulley tinware had the captive nuts and also did the new baffles. I therefore had to remove the captive nuts and use the lower tinware.

Some alignment issues around the exhaust studs (most likely to do with the aftermarket tinware!)


Most of the tinware did fit together okay.The fan housing did not want to sit down square and has a slight lead rearwards but this was the same as before.


4. Distributor Drive


The new engine comes without the distributor drive fitted. This is the first time I have had to remove and refit a distributor drive. So I decided to remove the old one as it fits the Brazilian distributor and reuse it on the new engine. (I did buy a new one just in case)

I purchase a tool to make removal easy. I checked the position of the old one before removal.


Old position at TDC (No1 firing)


Some slight wear of the teeth surface only. Good enough to re-use

After checking the two shims both where within specification of 0.6mm each I decided to reuse in new engine


Refitted drive in new engine. 

The position was in the same place and also the TDC and cylinder No 1 lead was in the same position for the old and new engine. Its an odd place for No 1 lead but its what I also have had and also the Brazilian engine must require it to be there.

5. Fuel Injectors + Fuel Rails

After my previous post about injector cleaning I had to refit new seals to the top and bottom of the injectors. There are plenty of suppliers who sell the o-rings for the Bosch EV6 injectors. 


Simple enough job to slip them over the ends of the injectors

After fitting the new seals I could just clip them into the upper fuel rails. I was expecting them to be a tight fit in the rails but a small wipe of WD40 they just slipped in and the clips refitted to hold them in.


A little hard to get the clips to fit in the groove of the injector.

So once onto the rails the rail and injectors push into the manifold ends. Then retained with a single bolts to attach to the manifold.


Simple fuel rail attachment.

As a side comment if anyone wants EFI on a flat 4 air cooled engine then they typically modify stock manifold or twin carb manifolds. The Brazilian solution is great. Simple and good position. Shame the Brazilian EFI stuff is so hard to get hold off in US or Europe.

6. Inlet Manifold, Throttle Body & Idle Valve


All new rubber hoses and new Jubliee clips to ensure a good vacuum and no air leaks.

7. Clutch & Bearing


While the engines out and its new I thought it was worthwhile treating it to a new clutch and throw out bearing. Simple 200mm clutch kit.


So that is the build up completed. It took about 1 day (over two days as I had to get parts and take the youngest son out)

Jobs remaining:

- Oil in
- Oil pressure test without spark plugs
- Replace and refit fuel filter and lines
- Fire up the engine
- Find & Order HT leads (Using a mixture of old sets I replaced)

Next job the fitting and 1st fire up.........